
Follow In The Country...

The Mechanics of Hybridizing Hostas
The nuts and bolts of how to hybridize.
By Joshua Spece
Last revised January 22, 2008
Before you can actually do any hybridizing, you will need to know a little bit about the Hosta flower and how it works. The two main parts of the flower that a hybridizer needs to know are the pistil and the stamens.
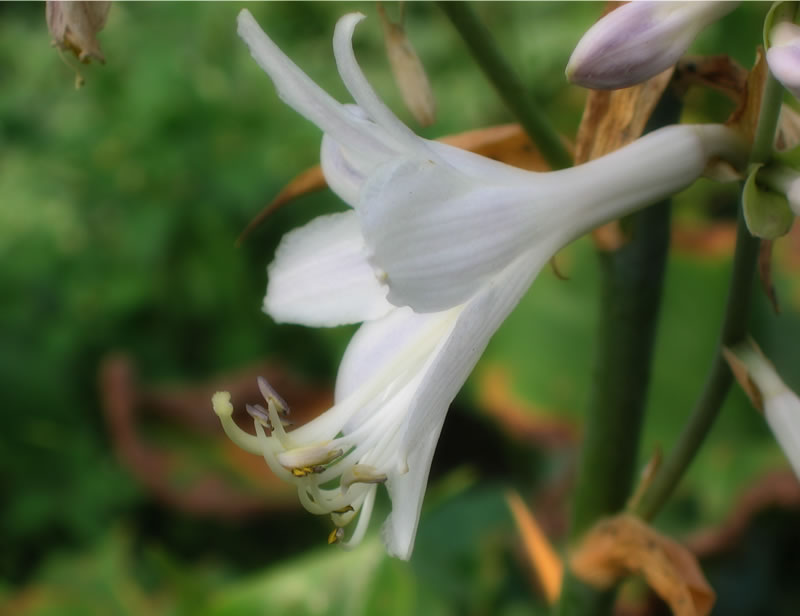
The male flower part is the stamen - comprised of the filament and anther. Hosta flowers typically have six stamens, which are usually shorter than the pistil. Each filament holds a single, pouch-like anther. When the flower opens, the anthers split open to reveal the fluffy, yellow pollen grains within.
It is helpful, though not as critical, to be familiar with these other parts of the flower.
- Tepal - The "petals" of the flower.
- Corolla - The entire colorful structure made up of the six tepals.
- Scape - The main stem that emerges from the Hosta crown and holds all the flowers.
- Pedicel - The short stem connecting the flower to the scape.
Preparing Flowers & Preventing Unwanted Pollination
Designer Genes
Ron Livingston shows us step-by-step how to cross pollinate Hostas. This video will clear up any questions on what to do and how. Ron also shows what he keeps in his hybridizing tool kit.
Download: Designer Genes (Windows Media Video - 15 mb)
To preserve the integrity of your hybridizing, you will need to prevent bees and other insects from pollinating the flowers before you do. Depending on your schedule and preference, there are a number of ways to go about this.
If you are an early riser, you can beat the bugs to the flowers. Bees and other pollinating insects usually don't begin their rounds until the sun has warmed things up. If you make your crosses early in the morning (between 5 and 6 am), there is no need to go to more extreme lengths to prevent unwanted pollination. For those of us who aren't morning people, other techniques will allow us to hybridize to a more leisurely schedule.
Some hybridizers fashion "Hosta condoms" for their plants. This is nothing more than a covering of some type than can be slipped over the entire stem of flowers. A simple plastic grocery bag will work, provided the plant receives complete shade. You don't want to cook the flowers! A square piece of fine netting, folded in half, and sewed together on two sides is another alternative. The idea is to keep insects from getting to the flowers before you do.
Another method is to remove the tepals the night before you will be pollinating. The tepals act as a neon sign and landing pad for insects. Without them, insects are not interested in landing on what remains of the flower.
By early evening, the buds that will open the next morning will swell up like a balloon. It is easy to tell which flowers will open. Gently grasp opposite sides of the swollen bud and pull. The corolla should tear right down the middle. Remove as much of the corolla as you can, being careful not to damage the pistil and stamens.

The downside of this method is that you will have to take the time to prepare each flower the night before. In addition to time, this requires a little planning ahead. On the plus side, you don't need any special equipment and it won't look like your closet is strewn across the garden!
The ultimate set-up involves a completely screened in hoop house or shade structure where you can work with the plants without worrying about bees. A bright window or sun room would work for a small scale hybridizer who doesn't mind keeping breeding plants in pots.
Collecting Pollen
Pollen provides a nutritious snack for many insects, so it can be helpful to collect the pollen you want to use to protect it from being eaten. Wind and rain can also disperse the fluffy pollen before you can use it.
Pollen will ripen both on the plant and after it is collected. Collecting pollen is just a matter of gently pulling the stamens from the flower. If you do this the night before, there will be no yellow pollen on the anthers. Let the stamens dry over night in a dry area. By morning, the anthers should be ripe with fluffy pollen.
Occasionally, the anthers will not ripen and split open willingly. Setting the stamens in a warm, sunny spot for an hour or two may coax the anthers to release the pollen. As a last resort, the anthers can be carefully cut open.
Double flowered Hostas present a unique and largely unexplored challenge. The flowers of most of the multi-petaled cultivars ('Fujibotan', 'Aphrodite', and 'Venus') are the result of the reproductive parts of the flower mutating into petal-like structures. This leaves the flowers useless for hybridizing. Or so it appears at first glance.
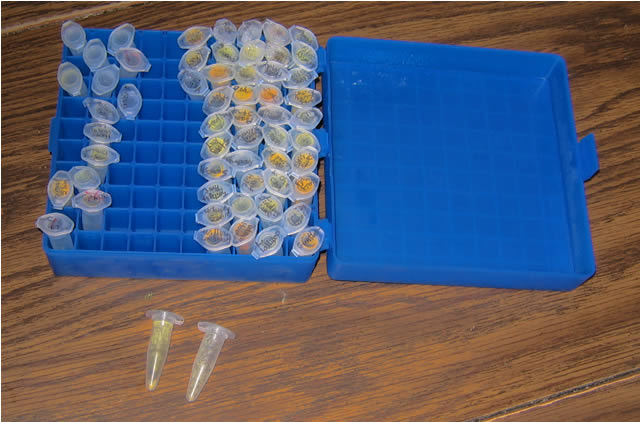
Storing Hosta Pollen
Storing pollen so you have it available whenever you need it is easier and safer for the plant. Pollen can remain viable possibly indefinitely, as long as it is frozen properly. The pollen should be allowed to dry for a day or two in a cool area. Then it is just a matter of storing it in an air tight container and freezing it. Some hybridizers find camera film bottles to be convenient. I like to use 1.5 ml microcentrifuge tubes. 100 tubes in the corresponding storage box take up very little room in the freezer and can hold enough pollen for 100's - if not 1000's - of crosses. To use frozen pollen, it is just a matter of removing enough pollen to make your crosses and letting it warm up for a few minutes. Then you're ready to pollinate!
Transferring the Pollen
The Mechanics of Pollination
Dr. Richard Gladon, of Iowa State University, gave this presentation on the technicalities of pollination to the Hosta Hybridizers Group in 2007. It gives fairly detailed information on the hows and whys of Hosta pollination and seed formation. Some great tips are included to help improve your pollination success rate.
Download: Mechanics of Pollination (pdf - 3.3 mb)
Provided by John Christensen
The actual act of pollination takes but mere seconds. The concept is very simple - you want to cover the stigma with pollen. The pollen grains are very tiny, but once the deed is done the stigma will be noticeably yellow.
The easiest way to apply the pollen to the stigma is to use the stamen as a tiny paintbrush. Grasp the filament and gently brush the pollen-filled anther over the stigma until it is yellow with pollen. A pair of tweezers may make handling the thread-like stamen easier.
Another option is to use a small paintbrush. Load up the bristles of the brush with pollen and apply it to the stigma. Be sure to thoroughly clean the brush when switching to a different pollen, so you don't accidentally contaminate your crosses.
Marking the Cross
After you make a cross, you will want to somehow mark the flower that you just pollinated. This will allow you to keep track of which flowers were pollinated with what pollen.
Many hybridizers use jeweler's tags. The pollen parent can be written on the tag with a fine tip UV resistant pen. Loop the string around the pedicel of the flower like a noose and synch snug. If marked with an appropriate pen, these tags will usually last until the seeds are harvested.
Another option is to use short lengths of colored wire. The wire is easily bent into a U shape, hooked around the pedicle, and twisted snug. The wire color, pod parent, and pollen parent are then recorded in a notebook. Each color corresponds to a specific pollen on a given pod parent, but the same color can indicate a different pollen donor on a different pod plant.

Aftercare
Once the cross is made and properly marked, there is little else to do but wait to see if the cross was successful. Three to four days after pollination, the base of the flower (the ovary) will begin to swell if the cross was successful. If the cross was not successful, the ovary will turn yellow and drop off.
When pollinating other flowers on the same plant, it may seem like your activity is causing earlier pods to fall off. A viable seed pod is firmly attached to the scape and jarring the scape, or brushing against the developing pods, will not cause a healthy pod to fall off. Pods that fall of that easily were not successful to begin with or were aborted for some reason.
Aborted Seed Pods
The Fertility section mentioned several reasons that pollinated flowers may not form viable seed. Once pods are formed, occasionally a Hosta will abort them prematurely. The cause of this is sometimes unknown and beyond our control.
Often, heat and dryness can be blamed. Temperatures over 80 degrees Fahrenheit greatly reduce pod set and can cause developing pods to abort in extreme cases. Constant soil moisture is also crucial during and after pollination. Deeply watering your pod plants the night before pollinating can increase your success rate.
Keeping Hybridizing Records
Writing and Saying Crosses
It is worth noting that crosses are written in a specific format. The pod parent is always first, followed by the pollen parent.
Pod parent x Pollen parent
When spoken, this is said Pod parent by Pollen parent.
Record keeping is very important in a serious hybridizing program. Hosta seeds and seedlings should always be carefully labeled at every stage of the process. It may seem like a lot of tedious, repetitive work, but this basic information will come in very useful in the future. After a few years of hybridizing, your records will contain a lot of useful information that will further your hybridizing program.
You will be able to determine what Hostas are most likely to pass on the traits you are after. Other plants may pass on undesirable traits and your records will help you decide which Hostas to eliminate from future crosses. Interesting characteristics may develop after several generations and you can trace the lineage of distinct seedlings through detailed records.
A spreadsheet is the easiest way to store data in an orderly fashion. Everyone will use a slightly different set-up, but a few things you may want to record include:
- Pod parent
- Pollen parent
- Year the cross was made
- Goals of the cross
After a seedling is deemed worthy of growing on and evaluating, many hybridizers will assign a unique code to each seedling. Often the code is a combination of several meaningful bits of information. It may include the year of the cross, an abbreviation for the cross, and a number unique to the seedling if there is more than one plant from the same cross. Take this code, or example:
- 06 - The cross was made in 2006.
- DBxABD - The cross was Hosta 'Dorothy Benedict' x Hosta 'Abiqua Drinking Gourd'.
- 1 - This is the first of several seedlings from this cross. If you kept four seedlings from this same cross, the code for each of these seedlings would be the same except this number (06-DBxABD-2, 06-DBxABD-3, etc.).
Everyone's coding system will be a little different. These codes will all be recorded in your spreadsheet along with any pertinent information about the corresponding Hosta seedling. Special characteristics, fertility, and bloom period are especially worth recording for seedlings.
- Introduction to Hybridizing Hostas
- Selecting Parent Plants
Goals, Fertility, Bloom Period - Hosta Genetics
- The Mechanics of Hybridizing Hostas
Flower Anatomy, Preparing & Protecting Flowers
Collecting & Storing Pollen, Transfering Pollen, Marking Crosses, Keeping Records - Hosta Seeds
Harvesting, Cleaning, Storing - Starting Hosta Seeds
Planting Containers, Planting Medium, Moisture, Heat, Germination Time - Growing Hosta Seedlings
Light Type, Photoperiod, Reflecting Light, Water, Fertilizer, Re-potting - Problems Encountered While Growing Hosta Seedlings
Damping Off, Fungus Gnats - Hardening Off & Moving Seedlings Outdoors
- Culling and Selecting Hosta Seedlings
- Hybridizing Resources
All content and images © 2024 by In The Country Garden & Gifts unless otherwise noted.